What are Kubernetes Nodes
A Kubernetes node is a machine that runs containerized workloads as part of a Kubernetes cluster. A node can be a physical machine or a virtual machine, and can be hosted on-premises or in the cloud. A Kubernetes cluster can have a large number of nodes—recent versions support up to 5,000 nodes.
There are two types of nodes:
- The Kubernetes Master node—runs the Kubernetes control plane which controls the entire cluster. A cluster must have at least one master node; there may be two or more for redundancy. Components of the master node include the API Server, etcd (a database holding the cluster state), Controller Manager, and Scheduler.
- Worker nodes—these are nodes on which you can run containerized workloads. Each node runs the kubelet—an agent that enables the Kubernetes control plane to control the node. Kubernetes nodes are used by organizations to run a variety of workloads, as a core component in modern DevOps processes.
Kubernetes Nodes vs Pods
A Kubernetes node is a single machine in a cluster that serves as an abstraction. Instead of managing specific physical or virtual machines, you can treat each node as pooled CPU and RAM resources on which you can run containerized workloads. When an application is deployed to the cluster, Kubernetes distributes the work across the nodes. Workloads can be moved seamlessly between nodes in the cluster.
A Kubernetes pod is the smallest unit of management in a Kubernetes cluster. A pod includes one or more containers, and operators can attach additional resources to a pod, such as storage volumes. Pods are stateless by design, meaning they are dispensable and replaced by an identical unit if one fails. A pod has its own IP, allowing pods to communicate with other pods on the same node or other nodes.
The Kubernetes Scheduler, running on the master node, is responsible for searching for eligible worker nodes for each pod and deploying it on those nodes. Each pod has a template that defines how many instances of the pod should run and on which types of nodes. When a node fails or has insufficient resources to run a pod, the pod is evicted and rerun on another node.
Kubernetes Node Components
Here are the primary software components that run on every Kubernetes node:
kubelet
The kubelet is a software agent that runs on Kubernetes nodes and communicates with the cluster control plane. It allows the control plane to monitor the node, see what it is running, and deliver instructions to the container runtime.
When Kubernetes wants to schedule a pod on a specific node, it sends the pod’s PodSecs to the kubelet. The kubelet reads the details of the containers specified in the PodSpecs, pulls the images from the registry and runs the containers. From that point onwards, the kubelet is responsible for ensuring these containers are healthy and maintaining them according to the declarative configuration.
kube-proxy
kube-proxy enables networking on Kubernetes nodes, with network rules that allow communication between pods and entities outside the Kubernetes cluster. kube-proxy either forwards traffic directly or leverages the operating system packet filtering layer.
kube-proxy can run in three different modes: iptables, ipvs, and userspace (a deprecated mode that is not recommended for use). iptables, the default mode, is suitable for clusters of moderate size, however it uses sequential network rules which can impact routing performance. ipvs can support a large number of services, as it supports parallel processing of network rules.
Container runtime
The container runtime, such as Docker, containerd, or CRI-O, is a software component responsible for running containers on the node. Kubernetes does not take responsibility for stopping and starting containers, and managing basic container lifecycle. The kubelet interfaces with any container engine that supports the Container Runtime Interface (CRI), giving it instructions according to the needs of the Kubernetes cluster.
Interestingly, Kubernetes does not directly support Docker, and in recent versions Kubernetes has deprecated Docker support. The reason is that Docker does not fully support CRI. It is technically possible to run Docker with Kubernetes, but in most cases, Kubernetes runs with other, lightweight container engines that are more suitable for fully-automated operations.
Understanding Kubernetes Node StatusSystem Info
Understanding Kubernetes Node Status
You can use the kubectl command line to view the status of a Kubernetes node.
kubectl describe node [node-name]
Here is an example of the status returned by a node:
Name:			kubernetes-node-861h
Role
Labels:		 kubernetes.io/arch=amd64
           kubernetes.io/os=linux
           kubernetes.io/hostname=kubernetes-node-861h
Annotations:        node.alpha.kubernetes.io/ttl=0
                    volumes.kubernetes.io/controller-managed-attach-detach=true
Taints:
CreationTimestamp:	Mon, 04 Sep 2017 17:13:23 +0800
Phase:
Conditions:
...
Addresses:	10.240.115.55,104.197.0.26
Capacity:
...
Allocatable:
...
System Info:
...
The most important parts of a node status report are: Addresses, Conditions, Capacity/Allocatable, and System Info. The node status report also shows the node’s taints and tolerations, which tell the Kubernetes scheduler which nodes are more appropriate to a specific node. You can read more about node affinities, taints and tolerations below.
Addresses
The Addresses section of the node status report can represent the hostname, as reported by the kernel of the node, the external IP of the node, and the internal IP that is routable within the cluster. The way these fields are displayed depends on whether the node is a bare-metal machine or a compute instance running in the cloud.
Conditions
The Conditions section of the node status report looks like this:
...
Conditions:
  Type		Status		LastHeartbeatTime			LastTransitionTime			Reason					Message
  ----    ------    -----------------     ------------------      ------          -------
  OutOfDisk             Unknown         Fri, 08 Sep 2017 16:04:28 +0800         Fri, 08 Sep 2017 16:20:58 +0800         NodeStatusUnknown       Kubelet stopped posting node status.
  MemoryPressure        Unknown         Fri, 08 Sep 2017 16:04:28 +0800         Fri, 08 Sep 2017 16:20:58 +0800         NodeStatusUnknown       Kubelet stopped posting node status.
  DiskPressure          Unknown         Fri, 08 Sep 2017 16:04:28 +0800         Fri, 08 Sep 2017 16:20:58 +0800         NodeStatusUnknown       Kubelet stopped posting node status.
  Ready                 Unknown         Fri, 08 Sep 2017 16:04:28 +0800         Fri, 08 Sep 2017 16:20:58 +0800         NodeStatusUnknown       Kubelet stopped posting node status.
...
Here are some of the common conditions that appear in a node status report:
- Ready—this is true if the node is ready to accept pods and false if the node is not healthy and cannot run new pods. Unknown means that the node controller has not received feedback from the node in the past 40 seconds.
- DiskPressure—this is true if the node is close to running out of disk space.
- MemoryPressure—true if the node is close to running out of memory.
- PIDPressure—true if there is too much processing running on the node as reported by the kernel.
- NetworkUnavailable—true if the node does not have networking configured properly.
Capacity and Allocatable
The Capacity and Allocatable sections of the node status report looks like this:
...
Capacity:
cpu: 2
hugePages: 0
memory: 4046788Ki
pods: 110
Allocatable:
cpu: 1500m
hugePages: 0
memory: 1479263Ki
pods: 110
...
These parameters reflect the node’s available resources, which determine how many pods can run on the node:
- Capacity—indicates the total amount of computing resources available on the node
- Allocatable—the amount of computing resources available for running normal pods
System Info
The System Info section of the node status report looks like this:
...
System Info:
Machine ID: 8e025a21a4254e11b028584d9d8b12c4
System UUID: 349075D1-D169-4F25-9F2A-E886850C47E3
Boot ID: 5cd18b37-c5bd-4658-94e0-e436d3f110e0
Kernel Version: 4.4.0-31-generic
OS Image: Debian GNU/Linux 8 (jessie)
Operating System: linux
Architecture: amd64
Container Runtime Version: docker://1.12.5
Kubelet Version: v1.6.9+a3d1dfa6f4335
Kube-Proxy Version: v1.6.9+a3d1dfa6f4335
ExternalID: 15233045891481496305
Non-terminated Pods: (9 in total)
Namespace Name CPU Requests CPU Limits Memory Requests Memory Limits
--------- ---- ------------ ---------- --------------- -------------
...
Allocated resources:
(Total limits may be over 100 percent, i.e., overcommitted.)
CPU Requests CPU Limits Memory Requests Memory Limits
------------ ---------- --------------- -------------
900m (60%) 2200m (146%) 1009286400 (66%) 5681286400 (375%)
Events:
...
This provides useful information about hardware and software on the node, including:
- Operating system
- Kernel version
- Version of kubelet and kube-proxy
- Container runtime details
How Many Kubernetes Nodes Should be in a Cluster?
Here are three criteria you can use to determine the optimal number of nodes in your Kubernetes cluster:
- Performance—simply put, more nodes enable you to run workloads with higher performance. Each node adds more compute and memory resources to the cluster. Some nodes might add special hardware resources like high-speed storage or graphical processing units (GPUs). A rule of thumb is to have about 20% more computing resources than the expected workloads, to allow for peaks and node failures.
- High availability—additional nodes in a cluster can enable high availability strategies, such as running multiple instances of the same pod. You can also use some of the nodes as redundancy for the master node, which is a single point of failure. As a general guideline, to enable basic high availability functions, a cluster should have two master nodes and at least 12 worker nodes.
- Bare metal or virtual machines (VMs)—you can add nodes to the cluster by adding more physical machines or running additional VMs on the same bare metal machine. In the cloud, when using services like Amazon EC2, all resources are virtualized. VMs are less reliable than physical machines because if a machine fails, all the VMs (nodes) running on it shut down. However, VMs are more cost-effective.
What are Node Selector and Node Affinity?
Kubernetes allows you to flexibly control which nodes should run your pods. It is possible to manually assign a pod to a node, but in most cases, you will define a mechanism that allows Kubernetes to dynamically assign pods to nodes. Two of these mechanisms are node selectors and node affinity.
Both node selectors and affinity are closely tied to Kubernetes labels. A label is a metadata you can attach to a Kubernetes resource, which lets you identify and manage it.
Node Selector
A node selector lets you specify which nodes the pod should be deployed on. The Kubernetes scheduler reads the pod template (also called pod specification), searches for eligible nodes and deploys the pod.
The simplest type of node selection is the nodeSelector field of the podSpec. It is a set of key-value pairs, which lets you define labels that the node needs to match in order to be eligible to run the pod. This is known as a label selector.
Node Affinity
Node affinities provide an expressive language you can use to define which nodes to run a pod on. You can define:
- Exact matches using the AND operator
- Soft rules indicating a preference for a certain type of node, but allowing the Scheduler to deploy a pod even if the constraint cannot be met
- Rules taking into account the labels of other pods on the same node, enabling you to define the colocation of pods
Node affinity is conceptually similar to nodeSelector – it allows you to constrain which nodes your pod is eligible to be scheduled on, based on labels on the node.
Taints and Tolerations
Taints are the opposite of affinity – a taint is like defining that a node “doesn’t like” a certain set of pods and those pods will, if possible, not schedule on the node. A node can have one or more taints defined on it.
You can define tolerations in pods templates, to indicate that despite a taint, you want to allow – not require – the pod to run on nodes that have a matching “taint”.
You can taints and tolerations to ensure pods are not scheduled onto nodes that are not appropriate for them.
Common Kubernetes Node Errors
Kubernetes node errors indicate an issue on a machine participating in a Kubernetes cluster, which can affect its ability to run and manage pods. Below are two common errors and what you can do about them.
Kubelet Stopped Posting Node Status (Kubernetes Node Not Ready)
If a node has a NotReady status for over five minutes, the status of pods running on it becomes Unknown, and new pods fail with ContainerCreating error.
How to identify the issue
- Run the command kubectl get nodes and see if node status is
NotReady - To check if pods are being moved to other nodes, run the command get pods and see if pods have the status
ContainerCreating
Resolving the issue
In some cases, this issue will be resolved on its own if the node is able to recover or the user reboots it. If this doesn’t happen, you can remove the failed node from the cluster using the kubectl delete node command.
Learn more about Node Not Ready issues in Kubernetes.
Kubelet Node Not Found
This error indicates that kubelet is not running properly on the node, so it cannot participate in the Kubernetes cluster.
How to identify the issue
Run systemctl status kubelet and look for the message node [node-name] not found
Resolving the issue
A common way to resolve this issue is to reset the node using the kubeadm reset command, use kubeadm to recreate a token, and then use the new token in a kubectl join command.
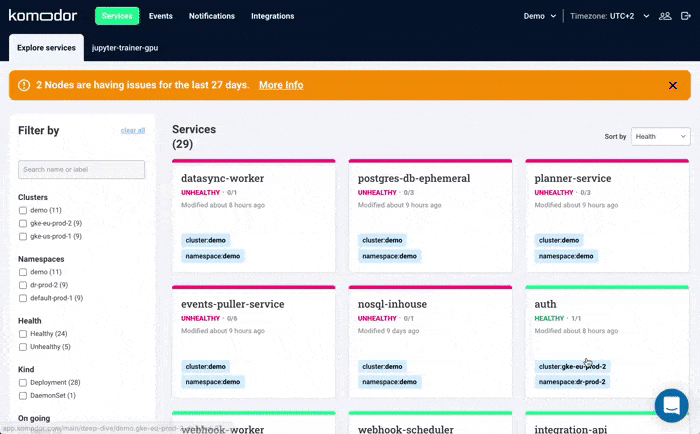
Solving Kubernetes Node Errors with Komodor
Kubernetes troubleshooting relies on the ability to quickly contextualize the problem with what’s happening in the rest of the cluster. More often than not, you will be conducting your investigation during fires in production. The major challenge is correlating service-level incidents with other events happening in the underlying infrastructure.
Komodor can help with our new ‘Node Status’ view, built to pinpoint correlations between service or deployment issues and changes in the underlying node infrastructure. With this view you can quickly:
- See service-to-node associations
- Correlate service and node health issues
- Gain visibility over node capacity allocations, restrictions, and limitations
- Identify “noisy neighbors” that use up cluster resources
- Keep track of changes in managed clusters
- Get fast access to historical node-level event data
Beyond node error remediations, Komodor can help troubleshoot a variety of Kubernetes errors and issues, acting as a single source of truth (SSOT) for all of your K8s troubleshooting needs. Komodor provides:
- Change intelligence: Every issue is a result of a change. Within seconds we can help you understand exactly who did what and when.
- In-depth visibility: A complete activity timeline, showing all code and config changes, deployments, alerts, code diffs, pod logs and etc. All within one pane of glass with easy drill-down options.
- Insights into service dependencies: An easy way to understand cross-service changes and visualize their ripple effects across your entire system.
- Seamless notifications: Direct integration with your existing communication channels (e.g., Slack) so you’ll have all the information you need, when you need it.
If you are interested in checking out Komodor, use this link to sign up for a Free Trial.
See Our Additional Guides on Key DevOps Topics
Together with our content partners, we have authored in-depth guides on several other topics that can also be useful as you explore the world of DevOps
Kubernetes Troubleshooting
- Exit Codes in Containers and Kubernetes – The Complete Guide
- How to fix CrashLoopBackOff Kubernetes error
- How to fix Kubernetes Node Not Ready error
Cloud Automation
Authored by NetApp
Learn about cloud automation techniques and tools, including IaC deployments with Ansible, OpenShift, and tips for DevOps pipelines.
See top articles in our cloud automation guide:
- Why You Need Infrastructure as Code to do DevOps Properly
- Deploying Cloud Volumes ONTAP and OpenShift Using Ansible
Digital Transformation
Authored by Hysolate
Learn how organizations around the world are transforming their operations with the help of digital technology.
See top articles in our digital transformation guide: