What is Kubectl Port Forwarding?
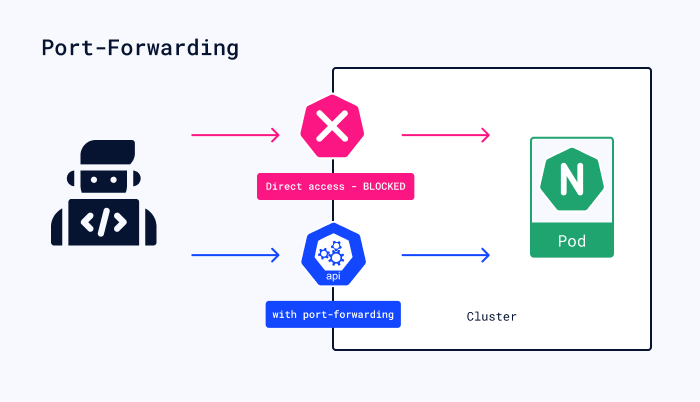
Kubectl port-forwarding is a method used in Kubernetes to access and interact with internal resources of the cluster from your local machine. This is helpful when you want to debug a particular service inside the cluster, but you don’t want to or cannot expose it publicly.
It works by creating a proxy in between your local system and the Kubernetes system, allowing communication between your local machine and a specific pod. It’s like setting up a direct line of communication between the local machine and a particular service within the Kubernetes cluster.
Here is the basic syntax of the kubectl port-forward command:
kubectl port-forward [resource-type]/[resource-name]
[local-port]:[resource-port]
Here is an example showing how the command is used:
kubectl port-forward -n default my-app-pod-7b48cf7bd7-27f79 8080:443
This is part of a series of articles about Kubectl.
How Does Kubernetes Port Forwarding Work?
The Kubelet’s Role in Port Forwarding
To understand how kubectl port forwarding operates, it’s important to learn about the Kubelet, an agent running on each node in your cluster. Kubelet ensures containers function as expected by communicating with the Kubernetes API server and managing container runtime (such as Docker) on its node.
When initiating a port-forwarding request using kubectl, it sends an HTTP request containing pod and port information to the kube-apiserver, which then forwards this request to the appropriate Kubelet based on the target pod’s node location.
Creating Connections
Upon receiving a port-forwarding request from kube-apiserver, Kubelet establishes two connections:
- A connection between itself and one of the exposed ports within the specified pod’s container.
- A connection between itself and your local machine using an available local network address/port pair.
Kubelet serves as a proxy between these connections, transferring data through its buffers. Traffic flows smoothly from your local machine to the target container(s) as long as both connections remain open.
Security Features
Kubernetes port forwarding offers several security advantages over public service exposure:
- Ports only accessible internally: By default, forwarded ports are only accessible on your local machine or within the cluster. This reduces the attack surface and minimizes the risk of unauthorized access.
- TLS encryption: Communication between kubectl and kube-apiserver is encrypted using TLS (Transport Layer Security), ensuring data confidentiality during transit.
- User authentication and authorization: Kubernetes checks if the requesting user has sufficient permissions to perform port-forwarding requests based on role-based access control (RBAC) rules. This ensures only authorized users can establish connections to sensitive cluster resources.
Limitations
Kubernetes port forwarding has some caveats:
- No load balancing or service discovery: Port forwarding operates at the pod-level, bypassing load balancing or service discovery mechanisms provided by Kubernetes services. You must specify the exact pod and port to forward, rather than relying on automatic routing based on service labels.
- Single-user access: By default, only one user can establish a port-forwarding connection at a time. If multiple users require simultaneous access, consider alternative methods such as shared volumes or exposing your application through an Ingress.
- Potential performance impact: As Kubelet proxies all forwarded traffic, it may experience increased CPU and memory usage during high-traffic situations. Monitor node resources carefully when extensively using kubectl port forwarding.
Learn more in our detailed guide to Kubectl get secret (coming soon)
Use Cases for Kubernetes Port Forwarding
Debugging Applications
One of the primary uses for kubectl port forwarding is debugging applications within your Kubernetes cluster. By connecting your local machine to a specific pod’s container(s), you can access logs, monitor performance metrics, or interact with an application through its exposed ports.
Accessing Internal Services
Organizations may choose not to expose certain services externally due to security or other concerns. However, authorized personnel still need occasional access to these internal services for maintenance or monitoring, even if they don’t have direct cluster access. Common examples of internal services are databases, messaging systems, and dashboard services.
Testing New Features
Kubernetes administrators often need to test new application features before deploying them to production environments. This can be done by setting up a separate application instance with the new feature enabled and using kubectl port forwarding to direct traffic from your local machine to that version.
Developing Locally Against Remote Services
Developers may wish to write code on their local machines while interacting with services running in a Kubernetes cluster (e.g., databases, APIs). By setting up kubectl port forwarding between local development environments and remote pods, developers can seamlessly integrate changes into their applications without constant redeployment or network configuration adjustments.
Examples of kubectl port-forward Commands
Basic Syntax
The basic syntax of the kubectl port-forward commands is as follows:
kubectl port-forward [resource-type]/[resource-name] [local-port]:[resource-port]
[resource-type]: The type of Kubernetes resource (e.g., pod, svc).[resource-name]: The name of the Kubernetes resource.[local-port]: The local port on your machine.[resource-port]: The port on the Kubernetes resource.
Port Forward to a Specific Port
To start exposing a service, first, retrieve all the services in a specific namespace:
kubectl -n [namespace] get svc
Replace [namespace] with the desired namespace where the service is located.
In order to test the following functionality, let’s first create a sample service that exposes 8080 port. We can use the following YAML configuration to the create the test-service.
apiVersion: v1
kind: Service
metadata:
  name: test-service
spec:
  selector:
    app: test-app
  ports:
    - name: http
      protocol: TCP
      port: 8080
      targetPort: 8080
  type: ClusterIP
We can apply this configuration using the following command:
kubectl apply -f sample_service.yml
Then, to port forward to a specific port, run a command like this:
kubectl port-forward svc/test-service 8080:80
This command establishes a connection between local port 8080 and port 80 on the “my-test-svc” service. Traffic sent to the local port 8080 will be forwarded to port 80 on the service.
If you press Ctrl + C or close the terminal, the port forwarding command will exit and you will lose port forwarding functionality.
Run kubectl port-forward in Background
To run port forwarding in the background, use this command. Adding the “&” symbol to the end of the command runs the process in the background.
kubectl port-forward [resource-name] [local-port]:[resource-port] &

Press Ctrl + C to return to the command prompt while port-forwarding runs in the background.
To kill the background process, first find the process ID (PID) by executing this command:
ps -ef | grep port-forward
The output looks like this:

This command searches for the “port-forward” keyword in the list of currently running processes and displays the process ID (PID) associated with it.
Kill the process by typing:
kill -9 [PID]
Replace [PID] with the process ID of the port-forwarding process. This command terminates the port-forwarding process, stopping the traffic forwarding between the local and resource ports.
kubectl Port Forwarding with Komodor
Inherent in Kubernetes is the propensity to render speedy test-runs and debugging quite cumbersome — an inconvenience that steadily results in significant time wastage and lost productivity. Testing a Pod or Service, for instance, exposed on port 80 could be tricky as it might be running on a virtual machine, or within a container, or on a distant node, while you really need to examine the workload in your local machine’s browser.
Komodor, however, offers a simple, one-click solution for port forwarding, letting you concentrate on your code. If you’re engaged in web client development, all you need to do is click on the relevant Pod or Service, scroll down and hit the ‘Forward’ button. Komodor then initiates port forwarding and launches the browser for you.
To learn more about how Komodor can make it easier to empower you and your teams to troubleshoot and operate K8s, sign up for our free trial.